Today I would like to talk about how we can build a serverless solution on Azure that would take us one step closer to powering industrial machines with AI, using the same technology stack that is typically used to deliver IoT analytics use cases. I demoed a solution that received data from an IoT device, in this case a crane, compared the data with the result of a machine learning model that has ran and written its predictions to a repository, in this case a CSV file, and then decided if any actions needs to be taken on the machine, e.g. slowing the crane down if the wind picks up. My solution had 3 main components:
1- IoT Hub: The gateway to cloud, where IoT devices connect and send data to
2- Databricks: The brain of the solution where the data received from IoT device is compared with what the ML algorithm has predicted, and then decided if to take any actions
3- Azure Functions: A Java function was deployed to Azure Functions to call a Direct Method on my simulated crane and instruct it to slow down. Direct Method, or device method, provide the ability to control the behaviour of IoT devices from the cloud.
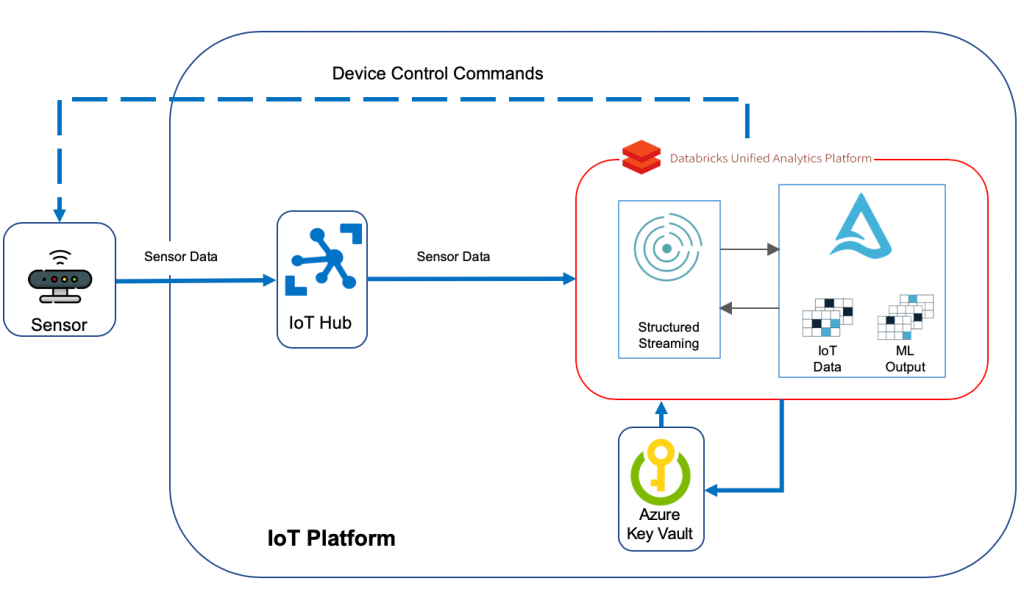
Since then, I upgraded my solution by moving the part responsible for sending direct methods to IoT devices from Azure Functions into Databricks, as I promised at the end of my talk. Doing this has a few advantages:
- The solution will be more efficient since the data received from IoT devices hops one less step before the command is sent back and there are no delays caused by Azure Functions.
- The solution will be more simplified, since there are less components deployed in it to get the job done. The less the components and services in a solution, the lower the complexity of managing and running it
- The solution will be cheaper. We won’t be paying for Azure Functions calls, which could be pretty considerable amount of money when there are millions of devices connecting to cloud
This is what the solution I will go through in this post looks like:

I must mention here that I am not going to store the incoming sensor data as part of this blog post, but I would recommend to do so in Delta tables if you’re looking for a performant and modern storage solution.
Azure IoT Hub
IoT Hub is the gateway to our cloud-based solution. Devices connect to IoT Hub and start sending their data across. I explained what needs to be done to set up IoT Hub and register IoT devices with it in my previous post. I just upgraded “SimulatedDevice.java” to resemble my simulated crane and send additional metrics to cloud: “device_id”, “temperature”,”humidity”,”height”,”device_time”,”latitude”,”longitude”,”wind_speed”,”load_weight” and”lift_angle”. Most of these metrics will be used in my solution in one way or another. A sample record sent by the simulated crane looks like below:

Machine Learning
Those who know me are aware that I’m not a data scientist of any sort. I understand and appreciate most of the machine learning algorithms and the beautiful mathematical formulas behind them, but what I’m more interested in is how we can enable using those models and apply them to our day to day lives to solve problems in form of industry use cases.
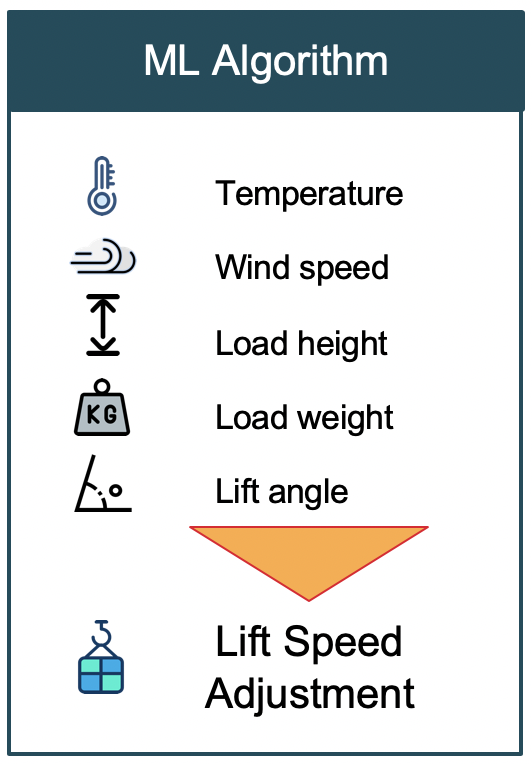
For the purpose of this blog post, I assumed that there was an ML model that has ran and made its predictions on how much the crane needs to slow down based on what is happening in the field in terms of metrics sent by sensors installed on the crane:

This is how the sample output from our assumed ML model looks like:

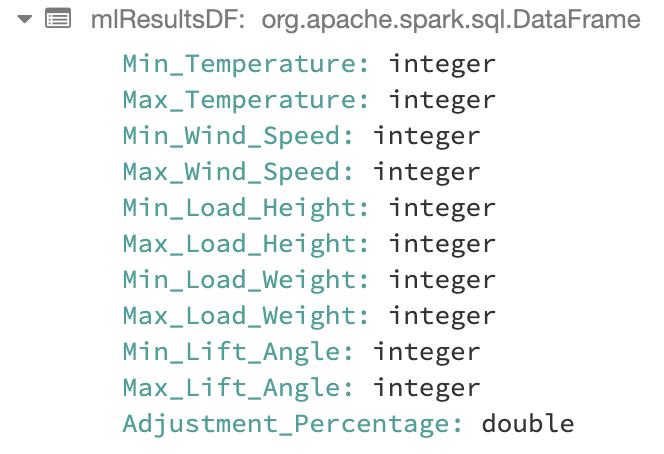
As an example to clarify what this output means, let’s look at the first row. It specifies if temperature is between 0 and 10 degrees of celsius, and wind speed is between 0 and 5 km/h, and load height is between 15 and 20 meters, and load weight is between 0 and 2 tons, and load lift angle was between 0 and 5 degrees, then the crane needs to slow down by 5 percent. Let’s see how we can use this result set and take actions on our crane based on the data we receive in real time.
Azure Key Vault
There are a couple of different connection strings that we need for our solution to work, such as “IoT Hub event hub-compatible” and “service policy” connection strings. When building production grade solutions, it’s important to store sensitive information such as connection strings in a secure way. I will show how we can use plain-text connection string as well as accessing one stored in Azure Key Vault in the following sections of this post.
Our solution needs a way of connecting to the IoT Hub to invoke direct methods on IoT devices. For that, we need to get the connection string associated with Service policy of the IoT Hub using the following Azure cli command:
az iot hub show-connection-string --policy-name service --name <IOT_HUB_NAME> --output table
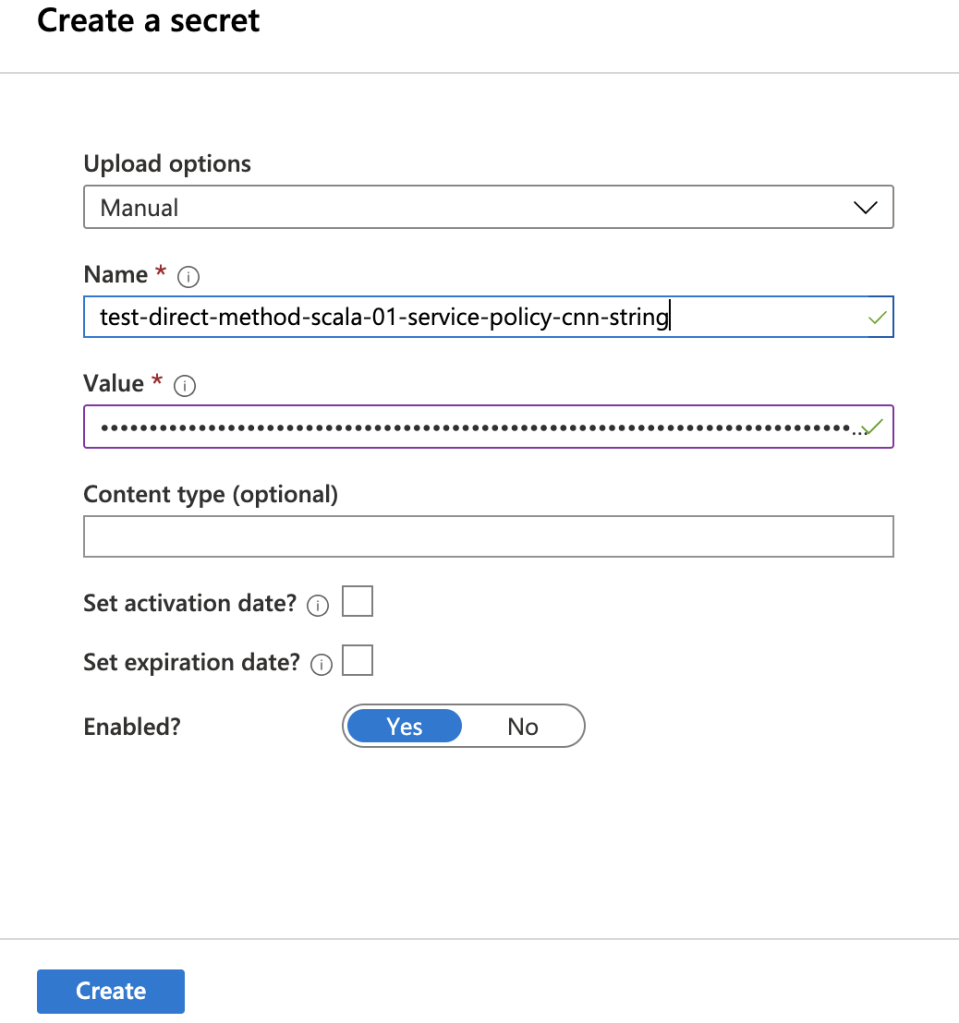
And store it in Azure Key Vault. So go ahead and create an Azure Key Vault and then:
- Click on Secrets on the left pane and then click on Generate/Import
- Select Manual for Upload options
- Specify a Name such as <IOT_HUB_NAME>-service-policy-cnn-string
- Paste the value you got from the above Azure Cli command in the Value text box

After completing the steps above and creating the secret, we will be able to use the service connection string associated with the IoT Hub in the next stages of our solution, which will be built in Databricks.
Databricks
In my opinion, the second most important factor separating Artificial Intelligence from other kinds of intelligent systems, after the complexity and type of algorithms, is the ability to process data and respond to events in real time. If the aim of AI is to replace most of human’s functionalities, the AI-powered systems must be able to mimic and replicate human brain’s ability to scan and act as events happen.
I am going to use Spark Streaming as the mechanism to process data in real time in this solution. The very first step is to set up Databricks, you can read on how to do that in my previous blog post. Don’t forget to install “azure-eventhubs-spark_2.11:2.3.6” library as instructed there. The code snippets you will see in the rest of this post are in Scala.
Load ML Model results
To be able to use the the results of our ML model, we need to load it as a Dataframe. I have the file containing the sample output saved in Azure Blob Storage. What I’ll do first is to mount that blob in DBFS:
dbutils.fs.mount(
source = "wasbs://<container-name>@<storage-account-name>.blob.core.windows.net/<directory-name(if any)>",
mountPoint = "/mnt/ml-output",
extraConfigs = Map("fs.azure.account.key.<storage-account-name>" -> "<Storage_Account_Key>"))
To get Storage_Account_Key, navigate to your storage account in Azure portal, click on Access Keys from left pane and copy the string under Key1 -> Key.
After completing above steps, we will be able to use the mount point in the rest of our notebook, which is much easier than having to refer to the storage blob every time. The next code snippet shows how we can create a Dataframe using the mount point we just created:
val CSV_FILE="/mnt/ml-output/ml_results.csv"
val mlResultsDF = sqlContext.read.format("csv")
.option("header","true")
.option("inferSchema","true")
.load(CSV_FILE)
Executing the cell above in Databricks notebook creates a DataFrame containing the fields in the sample output file:

Connect to IoT Hub and read the stream
This step is explained in my previous blog post as well, make sure you follow the steps in “Connect to IoT Hub and read the stream” section. For the reference, Below is the Scala code you would need to have in the next cell in the Databricks notebook:
import org.apache.spark.eventhubs._
import org.apache.spark.eventhubs.{ ConnectionStringBuilder, EventHubsConf, EventPosition }
import org.apache.spark.sql.functions.{ explode, split }
val connectionString = ConnectionStringBuilder("<Event hub connection string from Azure portal>").setEventHubName("<Event Hub-Compatible Name>")
.build
val eventHubsConf = EventHubsConf(connectionString)
.setStartingPosition(EventPosition.fromEndOfStream)
.setConsumerGroup("<Consumer Group>")
val sensorDataStream = spark.readStream
.format("eventhubs")
.options(eventHubsConf.toMap)
.load()
Apply structure to incoming data
Finishing previous step gives us a DataFrame containing the data we receive from our connected crane. If we run a display command on the DataFrame, we see that the data we received does not really resemble what is sent by the simulator code. That’s because the data sent by our code actually goes into the first column, body, in binary format. We need to apply appropriate schema on top of that column to be able to work with the incoming data with structured mechanism, e.g. SQL.
import org.apache.spark.sql.types._
import org.apache.spark.sql.functions._
val schema = (new StructType)
    .add("device_id", StringType)
    .add("temperature", DoubleType)
    .add("humidity", DoubleType)
    .add("height", DoubleType)
    .add("device_time",
         MapType(
          StringType,
          new StructType()
          .add("year", IntegerType)
          .add("month", IntegerType)
          .add("day", IntegerType)
          .add("hour", IntegerType)
          .add("minute", IntegerType)
          .add("second", IntegerType)
          .add("nano", IntegerType)
          )
       )
    .add("latitude", DoubleType)
    .add("longitude", DoubleType)
    .add("wind_speed", DoubleType)
    .add("load_weight", DoubleType)
    .add("lift_angle", DoubleType)
val sensorDataDF = sensorDataStream
.select(($"enqueuedTime").as("Enqueued_Time"),($"systemProperties.iothub-connection-device-id").as("Device_ID")
,(from_json($"body".cast("string"), schema).as("telemetry_json")))
.withColumn("eventTimeString", concat($"telemetry_json.device_time.date.year".cast("string"),lit("-"), $"telemetry_json.device_time.date.month".cast("string")
,lit("-"), $"telemetry_json.device_time.date.day".cast("string")
,lit(" "), $"telemetry_json.device_time.time.hour".cast("string")
,lit(":"), $"telemetry_json.device_time.time.minute".cast("string")
,lit(":"), $"telemetry_json.device_time.time.second".cast("string")
))
.withColumn("eventTime", to_timestamp($"eventTimeString"))
.select("Device_ID","telemetry_json.temperature","telemetry_json.height","telemetry_json.wind_speed","telemetry_json.load_weight","telemetry_json.lift_angle"
,"eventTimeString","eventTime")
.withWatermark("eventTime", "5 seconds")
The code above does the following:
- Defines the schema matching the data we produce at source
- Applies the schema on the incoming binary data
- Extracts the fields in a structured format including the time the record was generated at source, eventTime
- Uses the eventTime column to define watermarking to deal with late arriving records and drop data older than 5 seconds
The last point is important to notice. The solution we’re building here is to deal with changes in the environment where the crane is operating in, in real-time. This means that the solution should wait for the data sent by the crane only for a limited time, in this case 5 seconds. The idea is that the solution shouldn’t take actions based on old data, since a lot may change in the environment in 5 seconds. Therefore, it drops late records and will not consider them. Remember to change that based on the use case you’re working on.
Running display on the resulting DataFrame we get following:
display(sensorDataDF)

Decide when to take action
Now that we have both the ML model results and IoT Device data in separate DataFrames, we are ready to code the logic that defines when our solution should send a command back to the device and command it to slow down. One point that is worth noticing here is that the mlResultsDF is a static DataFrame whereas sensorDataDF is a streaming one. You can check that by running:
println(sensorDataDF.isStreaming)
Let’s go through what needs to be done at this stage one more time: as the data streams in from the crane, we need to compare it with the result of the ML model and slow it down when the incoming data falls in the range defined by the ML model. This is easy to code: all we need to do is to join the 2 datasets and check for when this rule is met:
val joinedDF = sensorDataDF
.join(mlResultsDF, $"temperature" >= $"Min_Temperature" && $"temperature" < $"Max_Temperature"
&& $"wind_speed" >= $"Min_Wind_Speed" && $"wind_speed" < $"Max_Wind_Speed"
&& $"load_weight" >= $"Min_Load_Weight" && $"load_weight" < $"Max_Load_Weight"
&& $"height" >= $"Min_Load_Height" && $"height" < $"Max_Load_Height"
&& $"lift_angle" >= $"Min_Lift_Angle" && $"lift_angle" < $"Max_Lift_Angle")
The result of running above cell in Databricks notebook would be a streaming DataFrame which contains the records our solution need to act upon.
Connect to IoT Hub where devices send data to
Now that we have worked out when our solution should react to incoming data, we can move to the next interesting part which is defining how and what of taking action on the device. We already discussed that an action is taken on the crane by calling a direct method. This method instructs crane to slow down by the percentage that is passed in as the parameter. If you look into the SimulatedDevice.java file in the azure-iot-samples-java github repo, there is a switch expression in the “call” function of “DirectMethodCallback” class which defines the code to be executed based on the different direct methods called on the IoT device. I extended that to simulate crane being slowed down, but you can work with the existing “SetTelemetryInterval” method.
So, what we need to do at this stage is to connect to the IoT Hub where the device is registered with from Databricks notebook, and then invoke the direct method URL which should be in the form of “https://{iot hub}/twins/{device id}/methods/?api-version=2018-06-30“
To authenticate with IoT Hub, we need to create a SAS token in form of “SharedAccessSignature sig=<signature>&se=<expiryTime>&sr=<resourceURI>”. Remember the service level policy connection string we put in Azure Key Vault? We are going to use that to build the SAS Token. But first, we need to extract the secrets stored in Key Vault:
val vaultScope = "kv-scope-01"
var keys = dbutils.secrets.list(vaultScope)
val keysAndSecrets = collection.mutable.Map[String, String]()
for (x <- keys){
   val scopeKey = x.toString().substring(x.toString().indexOf("(")+1,x.toString().indexOf(")"))
   keysAndSecrets += (scopeKey -> dbutils.secrets.get(scope = vaultScope, key = scopeKey) )
}
After running the code in above cell in Databricks notebook, we get a map of all the secrets stored in the Key Vault in form of (“Secret_Name” -> “Secret_Value”).
Next, we need a function to build the SAS token that will be accepted by IoT Hub when authenticating the requests. This function will do the followings:
- Uses the IoT Hub name to get the service policy connection string from the Map of secrets we built previously
- Extracts components of the retrieved connection string to build host name, resource uri and shared access key
- Computes a Hash-based Message Authentication Code (HMAC) by using the SHA256 hash function, from the shared access key in the connection string
- Uses an implementation of “Message Authentication Code” (MAC) algorithm to create the signature for the SAS Token
- And finally returns SharedAccessSignature
import javax.crypto.Mac
import javax.crypto.spec.SecretKeySpec
import java.net.URLEncoder
import java.nio.charset.StandardCharsets
import java.lang.System.currentTimeMillis
val iotHubName = "test-direct-method-scala-01"
object SASToken{
   def tokenBuilder(deviceName: String):String = {
        val iotHubConnectionString = keysAndSecrets(iotHubName+"-service-policy-cnn-string")
        val hostName = iotHubConnectionString.substring(0,iotHubConnectionString.indexOf(";"))
        val resourceUri = hostName.substring(hostName.indexOf("=")+1,hostName.length)
        val targetUri = URLEncoder.encode(resourceUri, String.valueOf(StandardCharsets.UTF_8))
        val SharedAccessKey = iotHubConnectionString.substring(iotHubConnectionString.indexOf("SharedAccessKey=")+16,iotHubConnectionString.length)//iotHubConnectionStringComponents(2).split("=")
        val currentTime = currentTimeMillis()
        val expiresOnTime = (currentTime + (365*60*60*1000))/1000
        val toSign = targetUri + "\n" + expiresOnTime;
        var keyBytes = java.util.Base64.getDecoder.decode(SharedAccessKey.getBytes("UTF-8"))
        val signingKey = new SecretKeySpec(keyBytes, "HmacSHA256")
        val mac = Mac.getInstance("HmacSHA256")
        mac.init(signingKey)
        val rawHmac = mac.doFinal(toSign.getBytes("UTF-8"))
        val signature = URLEncoder.encode(
        new String(java.util.Base64.getEncoder.encode(rawHmac), "UTF-8"))
        val sharedAccessSignature = s"Authorization: SharedAccessSignature sr=test-direct-method-scala-01.azure-devices.net&sig="+signature+"&se="+expiresOnTime+"&skn=service"
        return sharedAccessSignature
   }
}
The code above is the part I am most proud of getting to work as part of this blog post. I had to go through literally several thousands of lines of Java code to figure out how Microsoft does it, and convert it to Scala. But please let me know if you can think of a better way of doing it.
Take action by invoking direct method on the device
All the work we did so far was to prepare for this moment: to be able to call a direct method on our simulated crane and slow it down based on what the ML algorithm dictates. And we need to be able to do so as records stream into our final DataFrame, joinedDF. Let’s define how we can do that.
We need to write a class that extends ForeachWrite. This class needs to implement 3 methods:
- open: used when we need to open new connections, for example to a data store to write records to
- process: the work to be done whenever a new record is added to the streaming DataFrame is added here
- close: used to close the connection opened in first method, if any
We don’t need to open and therefore close any connections, so let’s check the process method line by line:
- Extracts device name from incoming data. If you run a display on joinedDF, you’ll see that the very first column is the device name
- Builds “sharedAccessSignature” bu calling SASToken.tokenBuilder and passing in the device name
- Builds “deviceDirectMethodUri” in ‘{iot hub}/twins/{device id}/methods/’ format
- Builds “cmdParams” to include the name of the method to be called, response timeout, and the payload. Payload is the adjustment percentage that will be sent to the crane
- Builds a curl command with the required parameters and SAS token
- Executes the curl command
import org.apache.spark.sql.{ForeachWriter, Row}
import java.util.ArrayList
import sys.process._
class StreamProcessor() extends ForeachWriter[Row] {
   def open(partitionId: Long, epochId: Long) = {
       println("Starting.. ")
       true
   }
   def process(row: Row) = {
       val deviceName = row(0).toString().slice(1,row(0).toString().length-1)
       val sharedAccessSignature = SASToken.tokenBuilder(deviceName)
       val deviceDirectMethodUri = "https://test-direct-method-scala-01.azure-devices.net/twins/"+deviceName+"/methods?api-version=2018-06-30"
       val cmdParams = s"""{"methodName": "setHeightIncrements","responseTimeoutInSeconds": 10,"payload":"""+ row(18).toString()+"}"
       val cmd = Seq("curl","-X", "POST", "-H", sharedAccessSignature, "-H","Content-Type: application/json" ,"-d", cmdParams,deviceDirectMethodUri)
       cmd.!
   }
   def close(errorOrNull: Throwable) = {
       if (errorOrNull!=null){
       println(errorOrNull.toString())
       }
   }
}
The very last step is to call the methods we defined in the StreamProcessor class above as the records stream in from our connected crane. This is done by calling foreach sink on writeStream:
val query =
   joinedDF
      .writeStream
      .foreach(new StreamProcessor())
      .start()
And we’re done. We have solution that is able to control theoretically millions of IoT devices using only 3 services on Azure.
The next step to go from here would be to add security measures and mechanisms to our solution, as well as monitoring and alerting. Hopefully I’ll get time to do them soon.
